Blog 5
Blog 5
-Week 11 Material for design
-Practical 3
-Week 12 Design for material
Week 11: Material for Design
This week we learnt about the criteria that are needed when selecting the correct material for our products.
There are a total of 3 steps.
Step 1: Listing the material requirement for the design
Step 2: Select and evaluate candidate materials
Step 3: Choose the most economical design
Step1
Function: What the product is used for
Constraint: Properties product needs to have
Objectives: The most important property/function of product
Step2
-Select the materials based on step1
-Rank the requirements and assign a weightage based on the importance
-Objective of the product should have highest weightage
Step3
-Determine which material that meets requirements is cheapest and easiest to handle
-Choose 2-3 of the highest candidates and compare the materials based on their economic viability
My group was then tasked to select a material for disposable razors🪒
We started off by determining the parts of the disposable razor before listing their respective material requirements
Disposable razor
-Blade
-Body
Blade
Function:
-Trim hair off body hair 💇♀️
Constraint:
-High Hardness (Prevent blade from deforming when used)
-Non-toxic (will not bring harm to user)
-Excellent Sharpness (Easy to remove hair)
-Stiff (Prevents blade from breaking)
-Corrosion resistant to water 💧
Objective:
-NEEDS TO BE HARD
Body
Function:
-Holds blade
-Acts as a handle
Constraint:
Light-weight (easy to handle)
Stiff (prevents handle from breaking)
Objectives:
-NEEDS TO BE LIGHT
We then selected materials that met all the criteria for the disposable razor before using COWS to find the most suitable material.
Blade: Brass, Stainless Steel 304, High Carbon Steel
Body: Epoxy, Phenolic, Polypropylene
Blade
Thus the selected material for the blade of the razor would be high-carbon steel.
Body
Thus the selected material for the blade of the razor would be Polypropylene.
Practical 3: Properties of Materials
In this practical, my group was tasked to carry out experiment 3C, to find the viscosity of an unknown fluid. For our experiment we used the flow cup method to determine the viscosity of the unknown fluid.


We first placed the flow cup onto the retort stand before placing a beaker below the flow cup.
Afterwards we measured the amount of solution using a beaker to pour into the flow cup.
We then proceeded to carry out our experiment.
1) Ensure the hole at bottom of the flow cup is covered with a finger, then pour the fluid to be measured into the flow cup 2) Place a beaker under the flow cup 3) Remove the finger from the bottom of the flow cup and start the stopwatch at the same time (simultaneous) 4) Once flow is interrupted for the first time, stop the stopwatch 5) Repeat a few times and obtain the average reading
This were time taken for the two solutions to flow.

As seen from the data recorded, between Standard Solutions #1 and #2, Standard #2 flows faster.
This is because Standard #2 (3.0cP) has a lower viscosity than Standard #1 (21.0cP). The Unknown Solution (16.308s) has a flow time between that of Standard #1 (25.715s) and #2 (16.190s). Thus, by plotting a graph and finding the relationship equation between Viscosity and Flow time, the Viscosity of unknown solution can be found. The viscosity of the unknown solution was 3.22cP.
Reflections Some of the things I learnt from this practical is that as viscosity increases time taken for fluid to flow increases. I also learnt that viscosity can be calculated in many different ways like using a flow cup or rotational viscometer or more. I also learnt about the linear relationship y=mx+c to determine viscosity.
Week 12: Design for materials
In the previous weeks, we learnt to find a material that meets product requirements. This week we learnt about changing designs to accommodate to materials. We needed to find a material with property attributes that meets or exceed requirement of a product and at the same time does not possess manufacturing difficulties and is not exorbitant in price is a dream of many product design engineers.
One example that was given to us was a hairdryer💇♀️
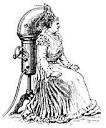
This was the version of a hairdryer in 1890 when it was first invented. It was not practical and not portable. Thus after a century, it was made more portable and less bulky so that it would be easier to dry ones hair.
My group selected the material: Imago frozen fabric

Changes:
-Use rechargeable batteries instead of disposable ones
-Use second hand materials to build the coffee maker
-Use solar panels to power the coffee maker instead of batteries
-Use glass instead of plastic to make the exterior of the coffee maker
Using solar panels to power the coffee maker instead of using batteries. However, using solar panels will be extremely costly and it will not fit our budget. It is also difficult to mount the solar panel onto the coffee maker.
Using rechargeable batteries instead of disposable ones. This way, less waste is produced and one can simply recharge the batteries instead of disposing them away after they run out.
Using second hand materials to build the coffee maker. Lesser waste is produced and materials that cannot be recycled can be used for a longer period of time thus being more sustainable.
Using glass to make the exterior of the coffee maker can make it more aesthetically pleasing, however, it can make the coffee maker much heavier and it can cause the heated water in the coffee maker to lose heat easily as glass is not a good insulator of heat.
Comments
Post a Comment